Sewed a button ont a shirt. (It was Thanksgiving....time was not available this week! :)

A place where I can empty my file cabinet full of papers that I've been saving on projects that I want to do in my "spare time," tips and tricks to give me more time, and what I'm actually able to do...when I really should be sleeping.
Showing posts with label Sewing Challenge. Show all posts
Showing posts with label Sewing Challenge. Show all posts


Sewing challenge catch up....
I've been frantically sewing to make sure I hit my goal of 52 things this year. 52 is really not a lot, especially when you only have to do 1 a week. For some reason I'm scrambling with only a few weeks left of 2011.
I worked on #37-42 last night. I darned a hole in a sweater. I sewed a strap back on an art apron. I fixed our plush Noah's Ark by sewing the head back on one of the animals (don't ask), a leg back on another, and the strap to the ark's plank. (The set has been used! ;) I also sewed a bell back on some jingle socks.
The good news....my "to sew" pile is dwindling. I have a handful of jeans left to patch and a few dress up costumes to fix. That's about it. This was my whole reason for the challenge in the first place, so YAY!!!
Appliqueing with knit {quick tutorial}

This is a Birthday gift for my little nephew. (Happy 1st buddy!!!) My sis had mentioned that he didn't have many long sleeve shirts, so here ya go! (This is in addition to the huge box of clothes and toys I'm sending up that my little man has grown out of.)
I grabbed a couple shirts at the store, brought them home and washed them. I usually wash the fabric first if its something that's going to be worn and washed.
I posted a full tutorial on appliquéing clothes here so won't do that again. Will just highlight any differences between cotton and knit.
I opted to use knit material for this set, where I usually use cotton. I like the knit because it doesn't fray, but doing the "m" was a little tricky and the knit wasn't a "firm" as cotton is when cutting and trying to place the applique. The other barely noticeable difference is when I got to the tiny edges (like star points) the knit gets pushed into the shirt with the needle, so you have to be really careful.


Other than that...sewing challenge #35 and #36, check and check.
Sewing Challenge {#32, 33, & 34}
Really trying to catch up here. I have 18 things to do, and only 7 weeks left. Yikes! Actually, I only have 15 left....I have 3 items that are finished, but I just haven't had a chance to take pictures and blog them since they were gifts for other people.
Today, I sewed a hook clasp back onto the hubs pants, darned a hole in one of my shirts, and sewed at patch onto one of my kiddos jeans. Phew.
Next....
Simple Superhero Cap and Cuffs {tutorial link}


My son was invited to a Birthday Party and like always, I ask the mom what she wants the kiddo to have as a gift. (A mom's and kid's idea of a good gift often differ, plus I wouldn't want to get them something they already have! :)
She knows me well and knows that I rather enjoy crafting, so sent me this link that she found on pinterest. Blankets weren't staying tied on when used as capes, so something else was needed. Never fear....Kelly to the rescue. :)
The tutorial is great, I just made a few minor modifications.
I bought 2 tshirts at the Dollar Store, since they weren't on sale at Hobby Lobby this week. From now on....I'm saving the shirts that dear hubs donates. This is such a perfect gift!!!
I opted for snaps (at the mom's request) at the neck instead of velcro, but am going to let them be tested and can add velcro if snaps seem to be cumbersome.
I used the green scraps to make these appliques. I cut 3 squares bigger than my star shape out of wonder under, ironed them to the knit scraps, then die cut the stars (you can trace and hand cut though), ironed onto cape, and then stitched with contrasting thread.

I used a freezer paper stencil that I cut with my silhouette to put the "M" on the back. The Birthday Boy's name started with an "M."


It wasn't very nice of me to have my sweet boy model for me then make him take it off so I could wrap it.

No worries....I promised him a set of his own. Hopefully he will forget until Christmas! ;)
Since I sewed on the appliques and the cuffs, this is SC#31....wow I am sooo behind!
Fall Burlap Pennant Banner {quick tutorial}

A quick and easy fall banner.
Supplies:
Burlap
Acrylic Paint and brush
Permanent marker (to match paint)
Jute
Sewing machine and matching thread or hot glue
How to:
I die cut my burlap, but you can easily cut the shape with scissors. I used my computer to write "fall" then sized it to what I needed. Print the letters in outline. Using either a lightbox or your window, put the burlap over the paper and trace the outline with a permanent marker. Paint in your outline. Be sure to put a scrap piece of paper under your work, so it doesn't bleed through on your desk/counter. Let dry. (Crucial step. Trust me. I had paint all over my sewing machine because I was too impatient.) Line up your pennants in order and sew the burlap onto the back of the pennant using a zig zag stitch. (This would have been a bit easier if I had used a cording foot, but once again...too lazy/impatient to get it out.) Optionally, hot glue or fabric glue the jute to the back. Or hand stitch.


Here it is on my (undecorated) mantle. Hey, its still September....for one more day.
It was 90 here yesterday. Not feeling too fallish yet.
Tomorrow. Tomorrow I'll decorate. Then it will at least be October!

A really simple skirt

Really, this was a simple skirt to make. I think it maybe took 30 minutes...including interruptions from my offspring. In fact, I was sewing this the evening before the first day of school.
Thanks to Dana from Made and her Simple Skirt Tutorial, I ran out the next day and bought more material to make more skirts for the girls. I might even make myself one!
For this one, I already had the fabric and elastic on hand. Yes I'm a hoarder....I like to call it being prepared. You never know when on the night before the first day of school your 6 year old is going to complain that she has nothing to wear and you need to whip up a simple skirt. I was prepared!

And look at these adorable Hide-eez. I'm getting them for all the girls. In multiple colors. I also took a stab at making a pair out of legging that my 8 year old tore a hole in the knee, but that's another tutorial.

{Sewing Challenge #30}
Sewing Challenge #29
I just sewed Rapunzle's hair back on. She is a stuffed doll that apparently gets a lot of use and this is mend #2 on her.
Sewing Challenge #28
Trying to get through some of the boring part of this challenge, then I can get back to the fun stuff. Hemmed a pair of my pajama pants that had ripped.
But....today I also went through ALL of the stuff I have to sew. I found lots of little projects. I have 24 items left to finish up my challenge. I have enough stuff in my pile to cover that without even getting to fun stuff. :)
Sewing Challenge #27
I picked up an item that has been waiting about a year for mending. Yep....One whole year. One of the girls' comforters. It was ripped from one side to the other across where the "quilting" ends. Its a twin, luckily. Not sure if my fingertips could have handled much more mending last night.
Simple shirred sundress or top or skirt {quick tutorial}

First off...sorry for the picture. I will try to do better! Its coming to the end of summer and I've not been nearly as productive as I thought I would with all the munchkins home. :)
This was a super simple project. So easy, that I made 2 (one for my #2 and one for me) and will be making 2 more (one for #1 and #4). Mine is a skirt or I can wear it as a top, then accessorize with a belt around the waist (as to not look maternity) and once it cools off a cardigan. #2's is a dress that she'll sometimes tuck in the straps and wear as a long skirt.
Supplies:
Shirred fabric (or you can shirr your own.)
Coordinating ribbon
Sewing machine and thread.
How to:
I've always seen this shirred fabric at Hobby Lobby and finally picked some up. Measure your subject around the chest, and buy accordingly. Make sure when you buy it, you measure the shirred part of the fabric and not the bottom edge. Cut, fabric about an inch or so smaller than measurement. I held it up to #2 here and tested for fit, then cut. My fabric has a pattern so cutting straight was easy. I used scissors, not a straight edge. Sew a seam straight down the back with right sides together. I surged mine, but a zig zag would work too.

You could leave it as is at this point, which is what I did with mine. I'm rather well endowed, ahem, so have no problem holding the fabric up when I wear it as a shirt. This little girl...not so much yet, so I made a "strap" to keep it in place.
Its just a ribbon I pulled out of my stash, cut in half, end folded under 1/4" and hemmed to the top of the dress on the inside. Once again, I had her put the dress on and carefully pinned where they should go.


Heat sealed the ends of the ribbon.
So easy!!!

This is sewing challenge #25 and 26 (since I made one for me, too!)
Sewing Challenge #24
I took in the waist of my son's swimsuit. Since we have a pool, the kids are in their suits almost every day and its seems that the elastic is not holding up. Anyway....took in the waist so we can use if for the rest of the summer.
Sewing Challenge #23
So I'm a bit behind on my sewing challenge for the year and wasn't planning on doing this today, but I did some minor surgery on one of my daughters stuffed dolls, Rapunzel. She had sprung a leak in two places and she now has the scars to prove it. In the process I thought I'd shove a needle through two different fingers. Why not?
Now I have one less thing in my "to fix" pile, two less bandaids in the linen closet, and one happy 6 year old.
Camera Strap Slipcover

For my first one...
(yes, I said first...I'm going to make another...a girl's gotta have options, right? :)
...I decided to skip the ruffle. I wanted to make sure I was going to like it and it would fit before I "ruffled" it. Plus, I didn't have a fabric I liked on hand (hard to believe), and its after hours at my local craft store.
Not bad for timing; I found/posted the idea here and its not even 6 weeks later. And its summer. And I have all 4 kids home. And family in town visiting.

But I snuck a way to my office for a bit and sewed. I sewed something for me! (I haven't been doing much of that lately.) Anyway...the only change I made from the tutorial I followed was to top stitch both sides. I'm a symmetrical person so had to have it even.

I lengthened the strap an inch because I made it to fit my camera strap. I love that its removable and washable. It only took 45 mins and that included getting everything out and cleaning everything up AND I was watching a movie. The next one will go much quicker.

{This is sewing challenge #22...I'm a bit behind so must get moving!}
Sewing Challenge #21
My Moby Wrap bag had sprung a leak....so I patched it. :)
Sorry, nothing exciting. Part of the reason for my challenge is to help me get through the mounds of "items to sew" that have piled up. :)
Shabby Bench Redo

If only I could whistle.... :)
This is what it looked like when I found it here.

Dontcha just love those legs???


Slap a little white paint on it...distress it a bit...throw together some sage burlap and voila.
.......
OK....so it wasn't quite that easy....but I'd do it again!
Since the burlap is a weave and not solid, I recovered the top with a white sheet first so you see the light through burlap, not ugly mauve.
(No offense to anyone who like that color.)

I cut off the original cording. I first attempted to truly reupholster it, but this baby was made well. I could not get even the first few staples out, much less the hundreds that were used. (And I wasn't about to ask for help from the hubs since he's less than thrilled that I have all this extra furniture in his garage anyway! You think he'd be happy that I'm finally moving some out!?! :)

See the pretty ruffle? I used the selvage edge of the burlap so I didn't have to hem the fabric before I ruffled it. I was feeling lazy creative.

She is for sale here. I secretly hope she doesn't sell, cuz I kinda want her at the end of my bed...but I guess that's not really a secret now, is it?
{Sewing Challenge #20}
Linking Here:

Applique Monogrammed Onsie {tutorial}

This was one of my baby shower gifts for my friend (does the fabric look familiar). The process is very similar to my heart applique shirt and my knee patches.
Supplies:
Clothing
Fabric
Wonder under
Iron
Pencil
Scissors
Optional: machine stitching edges

How to:
Figure out what letter you want (I use a template.) Cut a piece of wonder under a little bigger than your final shape, and a piece of fabric a little bigger than your wonder under.
Iron WU onto fabric per included instructions. Flip it over and trace or draw your letter onto the back. IMPORTANT: Draw your letter in reverse.


Cut it out, peel backing of your letter, place in center of your shirt and iron on following instructions.

With that, you can be done, but you can also take it a step further and sew the edges of the letter. I use heave duty wonder under that says "no sewing needed" but I always finish it off. I have found that maneuvering those tiny little onsies on my sewing machine is a little bit easier if I take off my tool box. Also make sure when you are sewing you are only sewing the top layer! (Ask me how I know that?? ;)

I straight stitched my edges this time, but sometimes I zig-zag. Just depends what kind of mood I'm in. Around the tight little corners, I don't use my foot pedal and "hand crank" the machine.
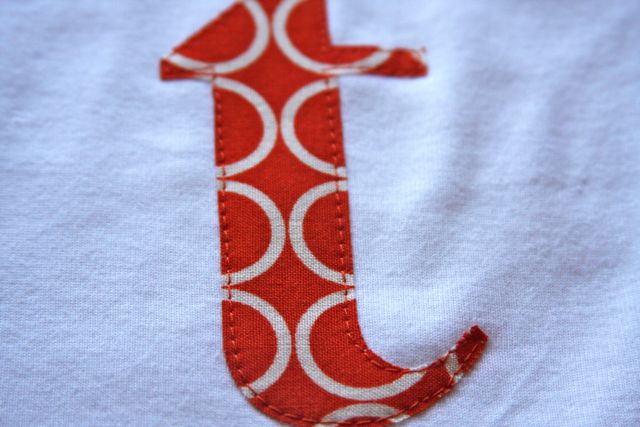
There you go! You can put these on blankets, bibs, burp cloths, you name it!
(This is also Sewing Challenge #19)
Crib Bumper

First off....I will take a proper picture of this in a crib once the baby's room is done. For now this is all I have. :)
This bumper is one piece of a set that I'm making for my friend, Katie. Its my baby gift to her. She chose the colors, fabric, and style of the bumper and I'm the labor. I enjoy sewing and decorating so this a really fun project.
I didn't use a pattern or a tutorial, I just kind of wung it. That's how I roll with these type of projects. I'll read a few sets of directions, then do what makes the most sense to me. If anyone reading this is thinking about tackling a bumper and wants more info...contact me. Its really just like making a giant pillowcase for a really, really, really long pillow.

I put piping only on the top (since the bottom is not going to show, why waste the time and materials?) The bottom was the last part I sewed, done with a simple straight stitch as close to the edge as possible while still sewing on the material.

The ties were not put on the top, but on the side...

...and made to knot, not tie in a bow....

...so they were made shorter.
Pretty picture to come once its in the baby's room. ;)
(This is also sewing challenge #18.)
3 Legged Bench

This was never intended to be a project for me. On my first garage sale-ing trip last summer my friend (and now business partner here) picked this little thing up for $3. I was eyeing it too, so I'm glad she grabbed it.
This is what she looked like we rescued her. She sat in my friends garage through the winter. I snagged her a few weeks ago and said I'd do a little slipcover for her. I first reupholstered her in some white twill that I had.


Then I sewed this little cover for her, ala Miss Mustard Seed. (I'm not even going to attempt a tutorial since MMS has done some fabulous video tutes. Start here. So worth the time to watch the series!)

Here's her cute little ruffle.

But wait.....something is missing.

Ahhhh....that's much better. A little freezer paper stencil! (My first one.....and definitely NOT the last!)


She is for sale SOLD here.
{This also completed my Sewing Challenge #17.}
Subscribe to:
Posts (Atom)
LinkWithin
