Painted Chevron Dresser {Tutorial}

What's a girl to do when her hubs leaves for a week and takes one of four children AND its spring break?  

Well, I painted.  
A lot!

All winter this lovely thing has been sitting in my garage begging to be painted.  We had a little warm weather and I had some free time, so I got busy.
My first step was to locate all my supplies.  After a long winter, it took awhile.  Turns out I'm not so great at cleaning brushes.  I'm the wrap-and-put-it-in-the-fridge/freezer-because-I'm-going-to-use-it-again-soon type of gal.  Then I run out of time and forget. 

Don't do this. 

Clean your brushed as soon as your project is done.  This way, when you finally get some time....you won't be looking EVERYWHERE for your brushes and can't find one....cuz they are all frozen in time with paint...and you have to resort to a small roller.

Supplies:
Annie Sloan Chalk Paint in Old White and Duck Egg Blue
Brush (not a roller! :)
Sanding Block
Painters Tape
Tape Measure and Pencil
New Knobs (optional)

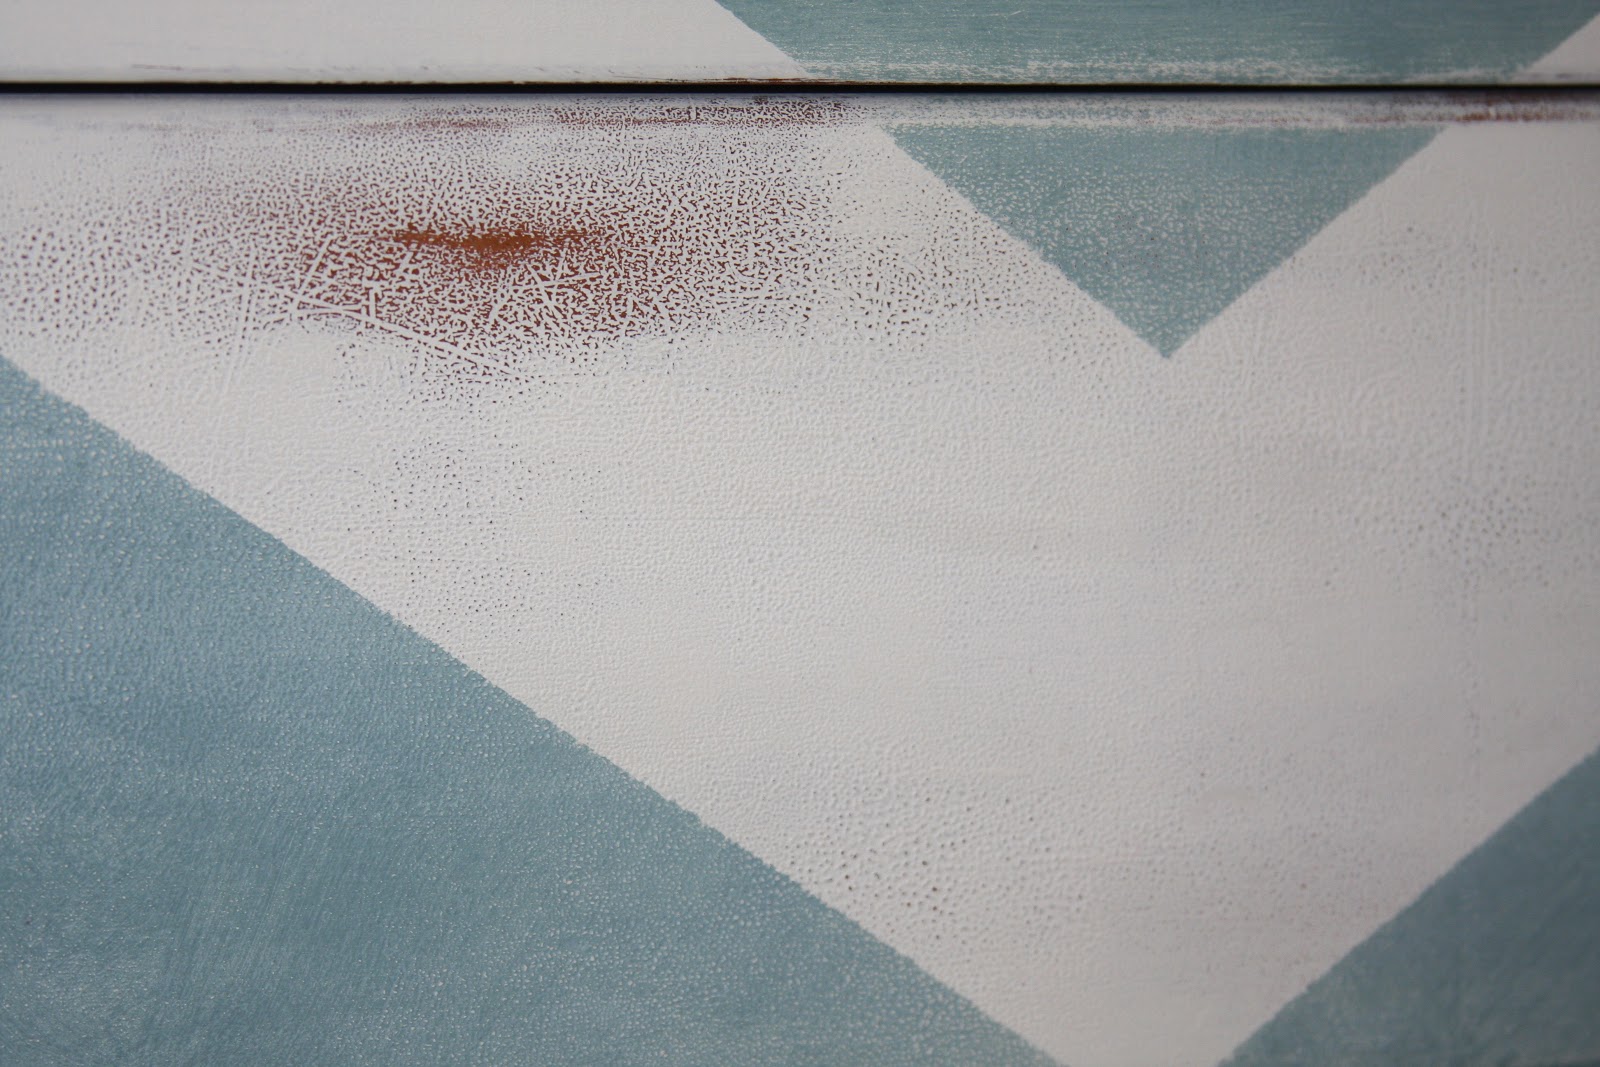
I LOVE ASCP because there is no priming involved.  You just remove knobs (if applicable), clean your piece and starting rolling.....er, I mean painting.  In this case, using a roller happened to be a blessing in disguise.  This dresser has a wonderful texture and rolling preserved it.  
 Can you see it?
After two coats of paint, I let her dry as I went inside to fix three remaining children lunch, and put one down for a nap.
Then I tried on the new knobs I had chosen.  
Total sidebar....I took my girls on a little errand to Hobby Lobby to pick out knobs...what a fiasco.  There were way too many choices!  I couldn't make a decision and my barely three year old was "helping" (no sense of design yet).  I ended up walking out NOT purchasing anything because I was so overwhelmed and stressed out with three kids in a store that has a lot of breakable items.  (Remember...hubs was out of town, so I HAD to take them with me.)  Went back the next day with a clear head and walked out with these wonderful 50% off glass knobs.

Measuring and taping off the chevron was the next step.  First decide how fat or thin to paint them.  I wanted mine more on the fatter side for two reasons.  First...I think it looks better...less busy.  Second....completely selfish...less taping! :)

I marked off the top and bottom points of the pattern and equally spaced them across and down the dresser.  Then started taping...point to point, up.  Point to point, down.  Make sure you tape the outside of the stripes you want to paint, which means inside the ones you don't want to paint. (Which is why the taping looks uneven.)
I also took a razor and "cut" the tape above and below each of the drawers since I kept the pattern "framed" inside the dresser edges.  (Picture is out of order, but wanted to show the tape on the drawer supports.) 
Before I pulled the drawers out and started painting, I marked a tiny "X" on the spaces I was supposed to paint.  Just to make sure I did the right ones.  Then painted the drawers first, then the supports (see above.) 
Ahhh....not bad for a day's work.
 The next next is distressing a bit, so I went at it with my handy dandy block sander.  I hit some spots heavily and the also gave the front and all over light sand to soften the edges of the chevron.
 Finally, a coat of AS clear wax, brushed on and buffed off.
Adding the glass knobs was the finishing touch!


I'm so happy that you can still see the crackly texture.
 I wish these were the colors of my house, because I love this one.  Unless the hubs lets me redo the entire first floor....this won't fit in. :(  Oh well, it will go up for sale as soon as the shop is finished with its remodel in a couple of weeks.
What a difference a little paint makes! 
Soon I'll show you everything else I painted over spring break....

Oh...and its for sale here.

Slouchy Crocheted Slipper Boots

So about 2 weeks before Christmas, I got a wild hair and decided I was going to crochet my kiddos and my cousins kiddos all slippers for Christmas.  

Yes.  Crazy.  I know.

But...I did it!  I was crocheted like a mad woman, but I finished.  I got this fabulous pattern from this Etsy store.  Actually, I bought 7 patterns. (I had a little clicky finger.)  Her patterns are wonderful.  Easy to read.  Pictures to help. Very well written.

They crochet up really quick and done with 2 strands for the shoe part.  Then you can decide if you want straight (and continue with 2) or slouchy (drop to 1).

I modified the boot cuff a little on these (the ones I gave my cousins girls) so that it ruches (ruched? rouched?)  a little.  On my kiddos, one requested straight (think Uggs) and the other slouchy.
I also added a cute little flower in each of the girls favorite colors from leftover yarn.   (I have a huge stash of yarn.)  I keep trying to use it up buy knitting and crocheting, but then I come across a new project and buy more yarn.  Help!  Its a vicious circle and I'm stuck!
The girls LOVED them.  So did all the other women in my family.  In fact, my cousin and aunt ordered a pair. :)  Hobby Lobby is still out of this grey, but I keep looking.

Crocheted Chevron Blanket

I love this blanket.  

I made it for a friend's baby shower and finished it up just in time to wrap and head out the door! :)  She wanted to put some turquoise in the room and I knew this would be the perfect pop of color for her to throw over the back of the nursing chair.

In posting this, I realized I've never posted a crocheting or knitting project?!?!  The "yarn" projects are usually gifts that I'm scrambling to finish and, unfortunately, don't always get pictures.

I have been crocheting since college.  When I started in college (many moons ago) it was not a "cool" thing to do.  Or at least no one I knew crocheted.  I bought this book, yarn and a hook....and taught myself.  I still have the first blanket I made.  It was a strip blanket and turned out surprisingly even.

Well, I put the hooks away from awhile in lieu of knitting needles, but have recently pulled them all back out.  I forgot how much I enjoyed it.  Plus, it avails me to multi-task.  I can bring these on road trips, to my kids gymnastics meets, soccer games, watching TV, our Homeschool Coop...pretty much everywhere.  I usually keep a project in my purse (as long as they are still small).  

I wish I had a pattern to share, but alas it was so long ago I can't even remember what I did.   (I made this about 6 months ago and totally forgot to write down the specifics on it.  Oops!)  I can tell you that it was crocheted working two strands of yarn together and on average side hook. 
One thing to remember when you look through a book of patterns....look past the colors displayed.  Some of them are really....um....dated.  I took a generic "zig-zag" pattern in the book and decided I would do 4 lines of each color, instead of 2.Also, the pattern in the book didn't have an edging to it.  I think edging it cleans it up a bit so just did an extra row of double crochet around the whole thing. It kinda bothered me that the last chevron stripe was thinner than the rest, but I didn't want the sides too thick.  
 I used generic "Red Heart" yarn, but have since switched to "I Love This Yarn" because it is sooo soft and won't break the bank.  With red heart there is a great way to soften the yarn. 
 Here's my pinterest link to that how to.  Let me know if you try it and if it works!
I've made a few things since this blanket including baby booties, a fun bobble cowl, another baby blanket and some great slippers!  Will post those soon...


How to Really Clean a Chalkboard

Who doesn't love that new chalkboard look.  You know what I'm talking about.  That nice clean blank black slate....just begging to be written on. 

Ahhhh.....

The best way to clean it....POP!  Yes.  You read that right.  Soda!  Pepsi, Coke, Diet whatever you have around the house. 

When I posted my original tutorial on how I made this magnetic board, I was shocked when "I heart Organizing" featured it.

I received a lot of sweet comments and questions from her readers.  One of them surprised me though....and took me some time to try.  This was how to clean it.  A gentleman commented that he used to work for a bistro and they would clean their menu chalkboards with pop because it adds a tackiness that helps the chalk adhere.  At the time I was in a no-pop-drinking-stage.  I had just given up my Diet Pepsi and I wasn't about to bring the temptation back just to clean a chalkboard.

Silly me.  I had been cleaning with plain old water.
Here is what it looks like after its just been wiped down with a wet rag.  It looks nice and black right away, but once it dries, its a chalky grey.
Well, my weakness prevailed and I started drinking pop again.  I had a little leftover in a can, so poured it into a rag and started wiping.  It was a little messy, so I opted to use a little bowl and dip the rag.
Much easier!

Here it is part of the way through the first wipe down after it had dried.  Look at the difference!
(My can was empty, so I only got partially through the board.  
 Don't worry....I ran out and opened up another can. 

. . . . .

Finished the job and drank the rest, of course!

Here it is after one full coat and a little touch up. 
Um...Yah!  I was pretty shocked too!

I'm sure with another coat it would have been even darker, but after all that cleaning I was thirsty....so drank the rest. 

Pretty impressive, right?

I'm back in a "no-pop" mode, but keep an extra 2 liter on hand that was leftover from a gathering we had.  I wipe it down about once a month, because I love the blackness of the new board.

Hope this tip helps you, too!

Rounded Pennant Birthday Garland


I often get asked by friends to help with party decor and love to help.  This one was actually for a friend of a friend.  She gave me this invitation as a jumping off point.  It was a La-La-Loopsy party.  (Picture a big pink button where the yellow yard is cut.  I had to use it for one of the tissue paper flowers. ;)
Sadly, I did not have to purchase a single thing for this project.  I say sadly, because it means that my craft supply hoarding tendencies are getting a bit out of control. :)

I ended up putting a spacer pennant between the words with tissue paper.  I cut 8 layers (4 in blue and 4 in white) with my 4" scallop circle die.  Then crinkled them all up in my hand, opened them up and stacked them up.  A quick staple in the middle to hold them while I sewed on the button and voila!   
To tie in the button theme, I added a button for the "i" in both. 
I purposely strung the ribbon with more of the color showing (usually I put the ribbon in back of the pennant) because I wanted to bring out more of the pink.

I wish I could have gotten a picture of the pennant at the party, but I didn't know the party thrower.

Felt Ice Cream Cone Counting {Mini Tutorial}


This is a busy bag set AND a homeschooling counting manipulative.  Although my youngest doesn't exactly use it the way I want her to use it yet, she does love to match up the patterns.  So I guess it has many uses?

You could really make this out of paper to, but I used felt.  My sweet cousin bought my kindergartner a felt board for Christmas, so we are putting it to good use.
I picked up some light brown and "sprinkle" felt from Hobby Lobby and added with what I had in my stash. I used a light brown for the cones and Neapolitan colors for the ice cream.  I needed more ice cream colors, so added white and am now looking for "chocolate chip mint."  It took 8 sheets ($2.00 if I had to buy them full price.)  

I used these Accucut dies that I had in my supply 
I ended up using the pennant shape for the cone bases because the actual cone has the looped edges and I wanted them flat.  I just cut off the tabs.  I die cut 11 cone bottoms.  I thought about double layering them and stitching on the waffle cone pattern, but then I came to my senses and realized these were for a 3 year old.

The numbers were cut from black scrap felt with a wafer number die that I borrowed from a friend.  I glued them on with Aileen's fabric glue.  (I tried a few different kinds of glue, and this worked the best.)  There is no bleeding through of the glue, but I was careful about how much I used.  She's had the set for a couple of weeks and the numbers are still on....we will see how long it takes before she starts "picking" at them. :)
She can count her numbers already, but we are working on visual recognition and then putting them in order.  I also count together with her as she adds the scoops.

I need to cut more scoops as I didn't intend for her to do them all at the same time. I'm glad that this set has many uses and will be used for awhile.  
At this point she has more fun matching up the scoop colors than counting them, but that's fine with me!

Oh and she does pretend to eat them, too.

My next project....cupcake alphabet matching!

LinkWithin

Related Posts Plugin for WordPress, Blogger...