Felt Dot Garland {tutorial} {SC#9}


Need a super cheap decoration for the latest holiday?  This felt dot garland is just the thing.  It measures about 6 1/2 feet long for less than $1 for the whole thing.

Supplies:
Felt, 3 sheets (one in each color)
Die or scissors
Sewing machine and thread

How to:
I ran my felt through my die cut machine with my circle die.  There are 4 different circles ranging in size from 1" to 2 1/2" in diameter.  You can easily cut these out, it'll just take a little longer.  Make a template out of paper, pin the template to the felt and cut.

(Pardon the Valentine's colors.  I was planning on writing the tutorial for that holiday, but life happens and *Heart* Day is over. )


I cut 4 circles of each size in each color, so ended up with 48 circles.  You can do as many or as few as you'd like.


I piled all mine up then arranged them in color and size.  Mine's a pattern, but hey, throw caution to the wind and just put them together as you grab them in a random way.  (The Type-A-obsessive-compulsive side of me will not allow that....)

My pattern went (in size) large, med-large, med-small, small, repeat.  The color pattern went pink, white red, repeat. (Or, dark green, light green, white for St. Patty's day.)  Once again, you could just lay them out however looks good to you.


Thread your machine in a matching color (I went white) and pull about 8" of both the top thread and bobbin thread.  Set your machine to about 3.5 stitch length and start stitching away.  I ran my edges together with no spacing in between.  I got in quite a little rhythm and this sewed up in a snap!


Pull about 8" of thread at the end, and cut.  Voila.  

Walk around your house decide which shelf or cupboard or mantle you're going to hang it on.


If you don't feel like making them...I'm selling them in my etsy shop....

Headboard in the works


I just wanted to show you one of the things I've been up to lately.  This is after one coat of paint, so I'm halfway there. (Note: after cleaning, sanding, priming, sanding, cleaning....then one coat of paint!  That's only halfway :) This wasn't one of our "hotel" scores, but we picked it up off of Craigslist awhile back.  Its been sitting my garage waiting for time and inspiration and we finally found the latter.  (There's never enough time, right?)

BTW...Please excuse the mess.  You think there might be a "before and after" post about organizing a garage soon, but no. :)

This is our inspiration for the color:

Isn't it gorgeous?  The whole thing!


After going to 3 stores to find a good yellow spray paint, these are the two that I was down to.


The deep yellow won, hands down!  The paint is just the middle step, so I can't wait to see it done!  Right now the humidity is at 90% outside, so the paint is not drying very quickly.  We are expecting thunderstorms for the rest of the day so...hopefully tomorrow will be nicer.

I've had lots of plans to paint (cuz we have all that furniture!), but its either been to cold or too humid!

Shopping at a hotel closing...

Has anyone ever done this?  New and wonderful experience! Yesterday, I got a call from a friend (thx Amanda!) to let me know about a local hotel liquidation.  She knows that I love painting furniture and knew this was right up my alley!  

I called another friend (Michal), the one that I paint furniture with (we sell it here and on Craigslist) to see if she could go check it out.  I had all 4 kids home for the holiday, and one was sleeping, so was not going anywhere.

4 children + empty hotel selling furniture cheap + crazy mom = lost child  

So I didn't go yesterday.  Plus...we found out it was "invite only."  Both friends were able to sneak in and score some deals.  I went this morning to "help load and move furniture" and we just happened to find some more stuff.  

I was a little scared to tell the hubs, so called my mom first and yabbered about everything we found.  We brought it all back to my place to unload, photo everything and giggle at the screaming deal we got.

My guilty conscience got the best of me and after I "hid" everything around the house, I call the hubs and fessed up.  

Know what he said???

GO GET SOME MORE!

Whoop! Whoop!  (Love ya babe!)

Either he's hoping I can support us all on this and he can retire or he'd rather I take my paintbrush to something other than our own furniture???

Anyway....we went back for more this afternoon and got De-Nide!  So....we are grateful for what we got and are looking forward to painting and recovering it all! 

Pictures to come....

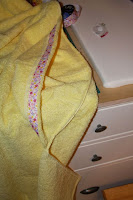
Hooded Towel {tutorial and SC #8}

I'm going to admit something to you.  This little project (which took maybe 1/2 hr) has been sitting in my craft room for....are you ready.....at least 15 months.  I bought the supplies a few months before my daughter was born.  

She turned 1 a few weeks ago.  

This is why I need a "sewing challenge" for myself.  To get stuff done and start using it, instead of just collecting supplies...which I'm very good at!

My older 2 girls picked the color for the baby.  The girls all have a matching ribbon, but the other 2 towels are pink and purple.
Supplies: 
1 hand-towel 
1 bath-towel or bath-sheet 
1 spool of thread to match 
24 inches of coordinating grosgrain ribbon 
Sewing machine 
Rotary cutter or scissors 
Ruler (a 6 by 24 inch plexi-glass ruler works the best) 

Directions:

Taking the hand towel lengthwise, sew ribbon 3/8” from the edge using matching (or contrasting) thread.  I usually match to the ribbon here.  Sew down both sides of the ribbon.  I start on the side closest to the edge.  Don’t worry about backstitching to secure, as you’ll sew the ends in later.
Fold back the towel so that approximately 3/8” shows on either side of the ribbon (basically centering it), and sew along the towels outside edge (sewing about 1 1/4 inches in on the towel.  This is where I change thread to match the towel.

Fold hand towel in half width-wise and right sides together (ribbon will be inside).  Measure 11 inches from the edge perpendicular from the fold and sew beginning from edge of towel, ending at the fold.

Cut a 1/2" from the seam and fold open the seam.  Using a zig-zag stitch overcast the seam allowance.  (no backstitch)
Fold the hood into a triangle (still inside out) with the seam you’ve just sewn running lengthwise down the center of the triangle. From the top point of the triangle, measure 3 1/2 inches down and sew (straight), backstitch to secure.  

Cut the excess 1/4 inch from seam and zig-zag or serge the edge.
Flip right side out and measure approximately 11 inches from the top of the hood.  Now you  are ready to attach the hood to the towel.
Fold bath towel in half and place a pin at the center point at the top edge.  With towel tag side down, attach hood center point to towel center point (outside to outside), then pin edges together.
Sew using 3/8 inch seam allowance.
Press hood up and sewing on the inside of the towel and hood) zig-zag over seam to stitch in place.

Ballard Designs Mr. & Mrs. Pillows

I had in my head the idea of doing a "his" and "hers" or "king" and "queen" or something to that effect.  Why didn't I think of "Mr." and "Mrs.?"  It could have been my great idea that paid $59 per pillow.  PER pillow people.  One.  One pillow for $59.  Really?  Not in my world. :)

Gotta love BD though.  Wonderful, wonderful place.  With spectacular buyers and designers.  

*sigh*

In my world its the "I can make that" mentality.  Its the thrill of the money saved.  The satisfaction that I did  that.

So....these pillows (and tutorial) will be coming to a blog near you soon.  

The only question is...burlap or drop cloth?

Valentines Applique {Quick Tutorial & SC #7}


Supplies:
Fabric
Wonder Under
Scissors
Sewing machine optional


Directions:
Fuse fabric to WU (according to directions which come with the WU.)
Cut your shape out.
Peel backing and place on shirt.
Iron again (follow directions for iron settings)

Optional:
Sew along edges.  You can straight stitch or zig-zag.  
The heavy duty wonder under says no sewing, but in my experience the edges will eventually come up with general wear and washing, so sewing is an extra step that will help it stay.

This is really how my "photo op" went.


Happy Love Day!

Valentines Day Food

Too Cute!


We will be doing this for Valentines day dinner!!!
(4 small kids + school night = no romantic dinner for me.)

And this for dessert:


From Bakerella (of course!)

Valentines Class and Teacher's gifts

3 of my 4 rug-rats are in school, so that means 3 Valentine's day parties, and LOTS of "favors."  Since there is only 6 days to go (2 for one of the parties...) I've found some fun ideas and this is what I'm doing this year.  Hope it helps you if you're looking for ideas!

#1 chose this:


From Skip to my Lou.  Tutorial includes printable.  You can find it here.


My #2 chose this one:


From Family Fun Magazine.  Tutorial here.

I'm going to change it slightly.  Instead of paper flowers, I'm going to knot ribbon around the stem and have #2 write her classmates names on the back.


#3 (the boy) chose this:


From Dana Made It.  Tutorial includes printable.  You can find this one here.  I'm going to die cut my hearts, so will stamp on the sentiment.

And for the teachers....

I'm going to do the treat jars.  I've been saving glass jars (shhh, don't tell the hubs) knowing there was going to be a use for them. (I'm a hoarder like that!)

Yes, I know I'm crazy doing 3 different things, but that what I get for asking the kiddos for their input.  I have everything here to do all of this except for the suckers, so its a great way to use of some of the supplies I've been hoarding saving just for a time like this.

Simple Sewn Heart Card {tutorial}

I love to play with paper and I love to sew.  What's even more fun....sewing paper!


Punch your hearts out of scrap paper and card stock, line 'em up, and sew 'em on.  Easy peasy.

I tend to temporarily adhere the punches to the card so they stay straight.  I even use a ruler, cuz I'm a bit obsessive particular about these things. 

You can do this with any shaped paper punch.  I've made them from butterflies, flowers, and stars.  Its a quick, easy, and a great way to use up your scraps!

Recovering a chair {SC#6}

Well, kind of recovering.  Recovering the seat and then sewing a "slipcover" for the back.  I did not take pictures of this (but should have) because it was all last minute.  This is a project for our furniture painting business that a friend and I have started. The Painted Paisley.


The bottom seat was easy.  Simply wrap and staple, then trim.  It was the top that took time.  The back is open as well (I should get pics...) so I had to "slipcover" it.  Its slightly angled so the straight lines of the checks threw me off!  I pinned it right sides together for a dry fit, then sewed 3 sides.  Turned right side out and checked the fit  It was great, so I turned it back inside out, trimmed edges and corners, then back right side out and stuffed it.  The bottom I had to tuck and whip stitched closed.


The cute little pillow will be my sewing challenge post for next weekend.  
(Trying to get a little bit ahead!)

LinkWithin

Related Posts Plugin for WordPress, Blogger...