

I've always wanted to do this and I usually wait to see how long we will stay before I decide if I'm going to put forth the effort just to move and let someone else enjoy my work. So I jumped. (You'd think I'd take it one project or one room at a time, but nope. Not me. I *LOVE* to start projects. Finishing them is always hard, but I'm working on that part!
Supplies:
Picture
Projector (or not if you can draw :)
Pencil
Paint and brush
(These were all on hand, so basically free art!)
(These were all on hand, so basically free art!)
How to:
Find your picture. After searching and searching for the picture I had created in my brain, these were the closest that I found.


I ended up going with the one on the right, because I wasn't sure how the wispiness (its a word...really) would show up.
Print out your picture.
After getting the projector setup and the picture centered, which was harder than it should of been because you have to think backwards and upside down when moving the picture around. My picture wasn't small enough to completely fit under the projector square so I had to fiddle with placement and move it half way through tracing.
I put the pic up on the wall and closed the binds. Stepping back I was worried that it was a little too scary looking, but I knew I was painting it white and hoped it would turn out pretty, not scary. (Should have taken a picture but was too excited to start drawing.)
Then I started drawing. The first few pencil marks were the hardest, then I had fun. I had to laugh because three of my kids were watching Mommy draw on the wall, which is something they've gotten in trouble for in the past. I went through 3 pencils sharpening trips to get it all on there we have really textured walls which ate the lead.


What??? You can't see it? Yah...me either. Which makes is a little difficult to actually paint in between the lines! My camera had a really hard time focusing to take these pics. Trust me...the tree is there. :)
Then you just start painting. Outlining first, then filling in. Here it is after a couple of hours. (It really shouldn't have taken me that long but I started with a small artist brush for the tips of the branches and forgot to grab my painting brush.


Then you just start painting. Outlining first, then filling in. Here it is after a couple of hours. (It really shouldn't have taken me that long but I started with a small artist brush for the tips of the branches and forgot to grab my painting brush.

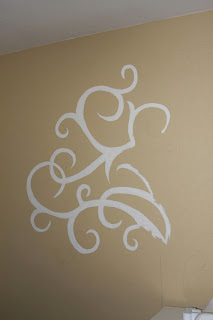
Here's another angle of the whole top part. (The room is really small...more of an afterthought for the builders I'm sure....and I don't have the right lens to get the whole tree.)

Here is the whole thing...

I still need to finish erasing the pencil marks and touch up a little. I actually gave me some anxiety before I started, but heck...its only paint!
I want to add either a few 3D flowers or birds or something.
At least I got to check something off my summer to do list!
Hi! I want to do something like this so bad in my girls room! I just don't know I trust myself and don't want to hire a painter!! As far as adding flowers or birds, I wanted to let you know, I picked up some small wooden birdhouses at joanns that were flat on the back. I planned on painting them and placing the randomly on the tree! I've also seen small shelves painted the same color as the tree and placed along the braches, super cute! I found your blog on iheartorganizing, I'm going to add it to my favorites! Love your chalkboard! Would loved to make one like it, although I may have to make 2... One for the play room! Hehe! Sorry, one more Q. For your vinyl chalkboard labels, where do you find your vinyl? I have been wanting to cut some of these with my cricut. Thanks!
ReplyDeleteThis looks amazing! I plan on doing this but on a deep burgundy wall-any tips to help the 'pencil line ' show up?
ReplyDeleteThank you for sharing this article, it is very easy to understand and informative. You can also use airless sprayer to help you paint faster and easier!
ReplyDeleteAirless Spray Gun