Showing posts with label Paper. Show all posts

Rounded Pennant Birthday Garland


I often get asked by friends to help with party decor and love to help.  This one was actually for a friend of a friend.  She gave me this invitation as a jumping off point.  It was a La-La-Loopsy party.  (Picture a big pink button where the yellow yard is cut.  I had to use it for one of the tissue paper flowers. ;)
Sadly, I did not have to purchase a single thing for this project.  I say sadly, because it means that my craft supply hoarding tendencies are getting a bit out of control. :)

I ended up putting a spacer pennant between the words with tissue paper.  I cut 8 layers (4 in blue and 4 in white) with my 4" scallop circle die.  Then crinkled them all up in my hand, opened them up and stacked them up.  A quick staple in the middle to hold them while I sewed on the button and voila!   
To tie in the button theme, I added a button for the "i" in both. 
I purposely strung the ribbon with more of the color showing (usually I put the ribbon in back of the pennant) because I wanted to bring out more of the pink.

I wish I could have gotten a picture of the pennant at the party, but I didn't know the party thrower.

Mod Podge Letters


The original one I did a few years ago and posted about on my monogram wall.  I cannot find the picture on my computer, so this is as good as its gets.  Can you see it?  Or the bottom part of it?  Up at the very top? ;)  Sorry!
The "B" and "H" were Christmas gifts for my mom and sis.  Christmas 2011, not 2012.  This is why its Finish It Challenge #4 and #5. :)  Yep....I'm behind. Although these were finished a month or so ago, I just haven't had time to blog them. 
I thought I had done a tutorial on them....so if I didn't, I will....soon. ;)

Pocket Die Cut Card

This is a project I started (gulp) two years ago.  The reason I know its been two years, is that they were supposed to be for one my girls' birthday invitations.....and her birthday is coming up...again.

I bought this fun pocket die cut (in retrospect I would not have purchased it, instead I would just sew up the sides) using the excuse of the invitations.  I make enough invites for baby showers, birthday's, etc, that I do use the dies.
 
This time instead of using them for invites, I'm using them for cards!
I added an eyelet from my collection of embellishments, ribbon from my scrap ribbon container, and a butterfly punch sewn on the inside to tie it into the paper.

"Hi" card

Super easy card.  All you need are scraps and a card blank!  The white was punched with an edge punch, then I layered pink, then the striped paper.  Tied a ribbon on.  I almost left it there, but it needed something else.  I'm not a sticker gal.  I print or stamp.  But....I have lots of sticker (not sure why since I don't use them) and need to us them up.  Then it looked to bare, so I added the jewels.
 This card was started 2 years ago, then dumped in a drawer during a sweep of my office. (Sad, I know!)  Its all finished now and ready to send!

Garland card {tutorial} with free printable

Warning: little story coming, so if you don't want to read, just skip on down to the supply list.

How this card came about....At one time a couple of years ago I taught crafting classes and one of the classes I did was a card class.  For it, I purchased a box of envelopes on ebay.  I couldn't find the right size (#9) locally so I headed online.  Each of box contained 500 envelopes.  That's right....500, for a class of about 20.  It was cheaper to buy 500 than a box of 50 at the store.  Well, the supplier didn't ship them in time, so when I contacted them, they sent another box for my trouble.   So, I have ONE THOUSAND #9 envelopes..  Since then, I've been using them here and there, but decided that in my recent attempts to reorganize my office, I need to start making cards to fit the envelopes and use them up.  In the past few days I've come up with a few really cute ones (at least I think so! :)

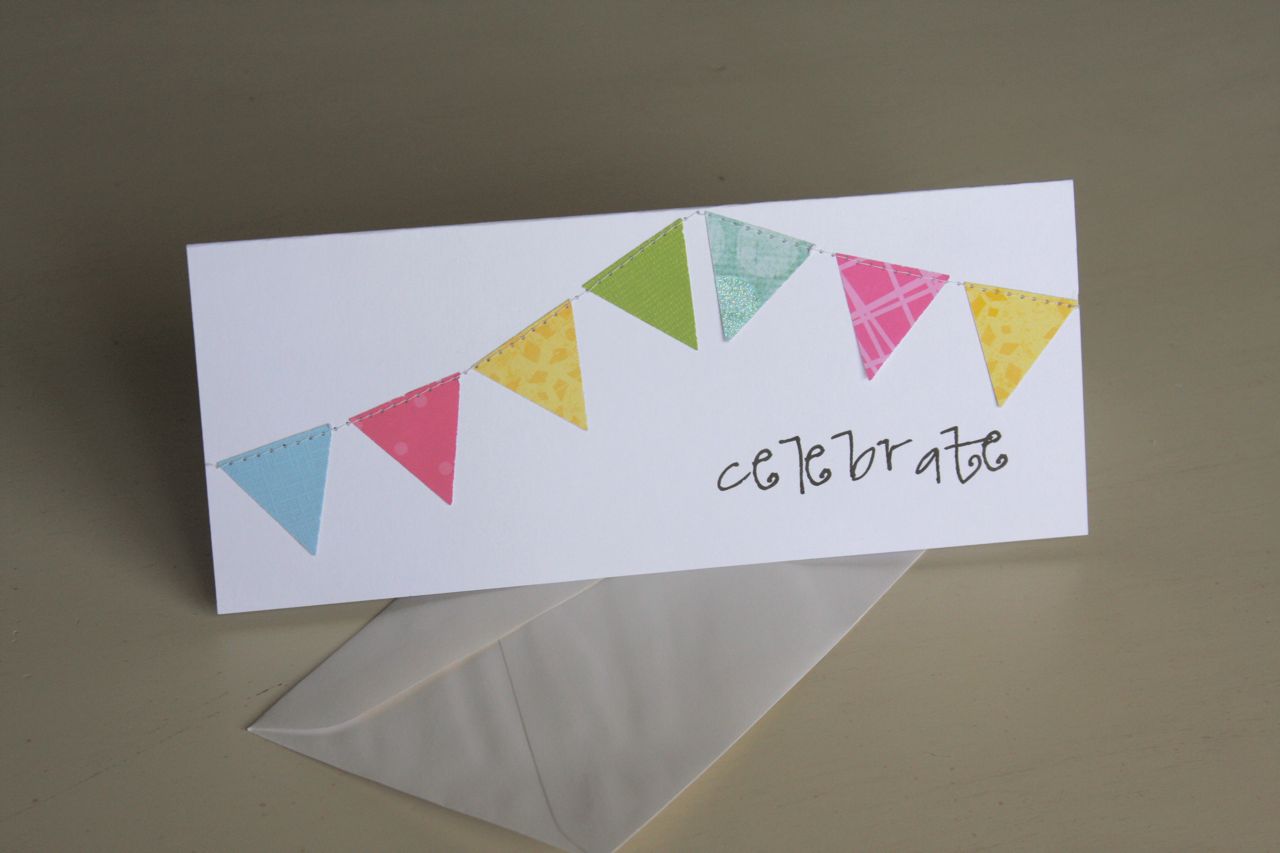
I'm totally into the pennant garlands lately.

Supplies:
White card stock (or whatever color you'd like for your base)
Scrapbook paper scraps
Envelope (need some?  I have plenty! :)
Triangle punch or scissors
Sewing machine or marker
Adhesive
Printer

How to:
I like to format my own cards on the computer so I can use the vast selection of fonts that I have accumulated.  (I'm addicted to fonts!)  For this one, I set my paper size to 8 1/2" W x 7"H (which is twice the height of the card).  You can use word, publisher or pages.  I add a text box where I want the text, select the font and type it in.

Here is the printable version:
(I hope it works.  This is the first time I've added a printable.  Please let me know if you have problems with it.)  Its formatted for the paper size above.
 

You can cut your paper before or after you run it through the printer or after.  (I usually cut mine before, just make sure you change the paper feeder to accommodate your paper size.)

After you print, use your scoring board or trimmer and stylus (or just fold it) to score the seam and fold the card in half.

For the pennants, I bought a punch.  I didn't intend to buy one, but I happened through Big Lots one day and this one was on clearance for $3.50 (down from $17).  Yes.  Please. :)  
Punch or cut a handful of pennants out of various paper scraps.  Play around with the placement until you like how they look and then glue them on.  
If you are going to sewn them, you only need to lightly tack them in place because the thread will hold them.  If you draw on your "string" then you need to adhere them to the card.
Either run it through your sewing machine or draw the string and you're done!
I've already formatted a bunch of these with various card sayings so I'm sure I'll be make quite a variety soon!

Another quick and easy card {quick tutorial}


I made a handful of these up for my daughter to use as thank you cards for her birthday.  It took less than 15 minutes and she loved them.

Supplies:
Card  stock
Scrapbook paper scraps
Envelops (or scrapbook paper for envelopes)
Adhesive
Flower, circle punches
Leaf punch (optional, because you can cut by hand)
Corner punch (optional)

How to:
Cut card stock into 4"x6" rectangles.  Round corners (if you want).  Punch flowers, circles and leaves from scrap paper and adhere to corner of card.  I used glitter paper for the center of the flower.  

I die cut envelopes out of coordinating scrapbook paper because I have A TON of it.


See....and this is not all of it! (Yes I'm working on my hoarding issues.)


That's is.  Quick and easy cards.

Party Decorations and Favors on a Budget


I have 4 kids, so throwing big Birthday parties every year is a little much.  So instead, we do a big party with friends every other year, and do a small family party every year.  We alternate years so I do two big parties a year, instead of four.
This year, my oldest turned 8 (which I still cannot believe!)  She wanted to do a party at the gymnasium where the kids take gymnastics.  I've never been one to "pay" for a party.  We have always had them here at the house.  At her last party, two years ago, I had about ten 5 and 6 year old girls running through the house shrieking and screaming....and I vowed never to do that again.  

Ever!

But I digress...

Since having the party at the gym, there really wasn't much I could decorate.  Plus, after paying for the gym,  I really wasn't wanting to spend a whole lot more moola.  


So...for less than $20 I had treats, drinks, and party favors.  I could have had that number down to under $15, but I opted to buy the cupcakes.  

I don't bake.  

And I was not in the mood to try this morning.  Partially because we ran out of time and partially because I didn't want to be tempted to stray from my diet healthy eating plan...which is really working BTW!

And again, I digress.  Sorry!

Here are my cupcake toppers and wraps.

Paper was mere cents (I have a stash of scrapbook paper to rival any small store.)
Popsicle sticks (on hand)
Punches and adhesive (on hand)
Die for cupcake wrapper (I have one, but you can buy these already cut in all colors...plus a silhouette can cut them too.  Side note...I do sell toppers and wrappers in my etsy store.)


Most of the "expense" was in the favors.  I found these cute little water bottles at the Dollar Store and I bought a few packages of Kool-Aid singles to put in each bottle.  Punched a scalloped circle tag and matted a "thank you" circle sticker on a scrap card stock circle.  Tied them on with ribbon from my stash.


Beverages were $2.00.  Two 6-packs of water bottles at the Dollar Store (I was already there, so why not.)  I simply cut scrapbook paper in 9 1/2" x 1 3/4" strips.  Taped one side on over the label, wrapped it around, and taped the other side on.  


I had to show the hubs my frugal work since I know that a bunch of 8 year olds wouldn't appreciate it! :)

Now I just need to whip up a few thank you cards and I'll be on to the next project....

"DREAM" Paper Pennant Garland (quick tutorial)


The hardest part of this little project...picking out the font! ;)  I LOVE fonts!!!  My favorite site lately is scrapnfonts  Cute stuff and super cheap!

Supplies:
Printer
Jute twine
Paper

How to:
Choose your font and increase the font size until it fits your size of pennant.

My pennants are 4" wide by 6" tall, so I re-sized my page to those dimensions and blew up the font.

Cut the paper.

Put it in the printer and hit print.

Punches holes and strung it up.

Easy Peasy.


Simple Card {quick tutorial}


Quick and easy!  

Supplies:
Card blank
Carstock or scrapbook paper 2 patterns, plus green scrap
Kraft paper scraps
Button and string (string optional)

How to:
I use the 4" x 5 1/2" card blanks, so these measurements are for that size.  Cut your background paper to 3 1/2" x 5" and adhere to blank.

Punch a  1 1/2" flower or scalloped circle out of kraft paper.  Punch a 1 1/4"circle out of your second patterned cardstock.  Punch a 3/4" circle out of kraft paper.   

Line your flower pieces up and punch two small holes.  Put your button on top and thread string through.  Tie a knot or bow and cut your ends.

Adhere to card where ever you'd like!  I use dots for this because of the weight of the flower I feel its more secure.

Cut or punch leaves out of green paper and adhere.  

This is an anniversary card, so I stamped "happily ever after" inside the card. 


Here is another variation.  I printed a page of "thank you" on circle labels.  Matted the label with another circle punch and adhered this with a pop dot.  These were the thank you cards that I made for the mom-to-be for shower thank you cards.

Map Cards and Envelopes


The hubs is in a purging mode.  I have to be sneaky about checking boxes before they head to his trunk, which is why I usually volunteer to take the boxes to donate.  Don't get me wrong, I'm purging too, but I have to make sure the things that leave the house and things I want to leave the house.  Know what I mean?

Anyway....an old NW Map book was in the pile and I rescued it and now I'm turning trash into treasure!  

I few years ago I bought some envelope dies for my Accucut.  I  bought them and once they arrived I though....now what?  I normally use card blanks for my cards and those come with envelopes.  

Hmm...I'm using up some of my random pieces of scrapbook paper...when my mom comes to visit she buys and cuts wrapping paper (cute!)...but what else???  

Enter map book.  

Which is now a stationary set!


I'm selling them here in my etsy shop.

Making your own party Invitations {tutorial}

First off....the orange is really not that bright!!!  Its more of a burnt orange.  As usual, I'm working on these at night and taking pics with a flash.  I can never get oranges and reds to be true.  Any hints from you photographer types???

I know it would be so easy to just pull up a site that prints invitations, insert your information, type in your credit card information and hit send.....but not for this crafty gal!  I always make my own invitations, baby announcements, and cards.  I even volunteered to make my sisters wedding invitations....all 300+ of them!

These are for a friend of mine who is having her third boy.  She is decorating the room with grey, orange and white, so that's what we're going with for the party theme.

Instead of making every invite the exact same, I usually go with a color theme and vary the card stock.  I use the same "template" but different card stock.  In this instance, I was making about 50 invites.  It was just as cost effective for me to buy an entire pack of patterned card stock (on sale) as it was to buy just the individual sheets I would need...and I have a lot left over!

Supplies:
Card stock, colored and white
Paper cutter
Paper punch or die cut (or scissors)
Adhesive

How to:

Cut your base card stocks (12x12 size) into three 4" strips, then score them at 2 3/4" and 8 1/4."  This is so you can fold the edges in and the top flap hits directly in the middle.
I have a wonderful cutter (Zutter Dreamkuts) that I use all the time!  But a paper cutter works just as well.  I also have a scoring board (Scor-Pal), but if you have a dry embossing stylus, you can use it on your paper trimmer in the little gully where the blade cuts.

I type up my own invites using Publisher....and that's a whole other tutorial.  I use it for the invites, the saying on the front and the directions.  Then print and cut.  If you have a square paper punch it makes the cutting much easier...and exact!

I die cut my antique squares, but you can make a template, trace and hand cut if you need to.

Cut your band strips.  I made mine 9 inches by 1 inch.  Make sure to make them long enough to wrap around the card plus overlap a little so you can adhere it together. 

Here are the supplies for one invite.  Once everything is cut, its a really simple assembly.
Fold up your base on the score lines and adhere you invite info.  I put some adhesive on all four corners of the back side of the invite, plus a little strip in the middle.
Make sure you get the right side up.  You want the bigger flap to fold up first.
Add a line of adhesive to one end of the back of the band.

Set your invite (right side up) on you band (pattern side down) with the adhesive at the top.  I leave about 2 inches of overlap on the top.  Fold up your band, then fold down the top and put to secure.

The reason I put the seam in front is because I'm going to cove over it with the die cut.  It leaves the back clean and looks nicer.
Add your die cut and then your quote to the front.  Instead of a quote you can stamp a picture or layer another die cut.  Options are endless.
That's it!
For under $0.50 per invite (including the envelope!) I'll take that considering just a quick search on the internet was coming back with anywhere between $1.19-$3.85 a piece!!!


LinkWithin

Related Posts Plugin for WordPress, Blogger...