Fall Burlap Pennant Banner {quick tutorial}


A quick and easy fall banner.

Supplies:
Burlap
Acrylic Paint and brush
Permanent marker (to match paint)
Jute
Sewing machine and matching thread or hot glue

How to:
I die cut my burlap, but you can easily cut the shape with scissors.  I used my computer to write "fall" then sized it to what I needed.  Print the letters in outline.  Using either a lightbox or your window, put the burlap over the paper and trace the outline with a permanent marker.  Paint in your outline.  Be sure to put a scrap piece of paper under your work, so it doesn't bleed through on your desk/counter.  Let dry.  (Crucial step.  Trust me.  I had paint all over my sewing machine because I was too impatient.)  Line up your pennants in order and sew the burlap onto the back of the pennant using a zig zag stitch.  (This would have been a bit easier if I had used a cording foot, but once again...too lazy/impatient to get it out.)  Optionally, hot glue or fabric glue the jute to the back.  Or hand stitch.
Here it is on my (undecorated) mantle.  Hey, its still September....for one more day.  
It was 90 here yesterday.  Not feeling too fallish yet.  
Tomorrow.  Tomorrow I'll decorate.  Then it will at least be October!

Dresser redo


I am LOVING this chalk paint stuff!!!  Besides the gorgeous finish, there is NO sanding and NO priming!  WooHoo!!!

I did a few repairs then painted it in ASCP Old White.  I lightly glazed it and put the original hardware back on.  


I know its a great piece when I want to keep it.  But alas....there is no room in my house, so it went up to the shop.


Here is what it looked like before.  Not too bad.  Some of the bottom had been chewed by....something?  I also had to do some veneer repair to the top.  Ugh.  First time, but it came out ok.


Hall Tree Makeover

This is a piece that has been painted and painted (before a certain *ahem* someone knew how to paint furniture) and painted.  And now painted again.  It has also been moved and moved and moved and moved.  It had been beaten up then stuck in room after room, then in the upstairs hall because there was no place for it.  I finally asked myself, "Why do you keep trying to make it work?"

So I attacked it with a light sand (only to clean up some of the bumps and bruises) and then some ASCP in Paris Grey.

See these hooks?  I took the bright silver ones off, since they didn't really fit.  I found these at an antique store.  I know they are supposed to be ceiling hooks, but they were the perfect amount of rusty and quirky so I put 'em on.
Then I waxed it and attacked it again to distress it.  There was no way I was stripping this baby and that's what it needed, so I figured I'd bring out the flaws rather then try to hide them.
 
And my dear friend hand painted this tile (since I broke the other one trying to get it out).
Here are the legs... 
Below the grey is black.  Below the black is white.  Below the white is wood.  They all make an appearance.

Here is the (almost) before and after.
Its up for sale in our booth SOLD.  I really like the after, but my entire house has a carmely-tan trim (which sets the tone for the entire house!), and grey just does not work with that!


Armoire Redo


(Sorry no "staged" picture, but this baby was too heavy to move around for pics, so I cropped out the messy garage! ;)

Found this baby on Craigslist (love CL!!!) originally for The Painted Paisley (the furniture painting biz I have with a friend).  
Then when I moved "B" to her own room, the room did not have a closet so I needed an armoire and decided I'd keep it.  I started painting it before the 115 degree 3 month heat wave set in and so  it sat, and sat, and sat in the garage with its base coat, but that's as far as I got.

We finally had a break and two of my kiddo's started school, so I had a little more free time and tackled the rest.

Ripped out the shelf inside and added a bead board backing.
Outside - ASCP Chateau Grey
Inside - ASCP Old White
Look at the pretty details on the front that are brought out with a little dark wax.
And the hardware that originally I was going to paint or replace, but looks perfect as is now!  

Before and After
Since I took so long I found another piece for the nursery.  This one is for sale SOLD here.

Braided headband

Got any leftover knit fabric?  An old t-shirt?  Or even just fabric scraps?  Quick and easy headband redo.  I found the headbands at the Dollar Tree, but any craft store will have them.

Here is an easy tutorial for them.  Enjoy!

A really simple skirt

Really, this was a simple skirt to make.  I think it maybe took 30 minutes...including interruptions from my offspring.  In fact, I was sewing this the evening before the first day of school.

Thanks to Dana from Made and her Simple Skirt Tutorial, I ran out the next day and bought more material to make more skirts for the girls.  I might even make myself one!

For this one, I already had the fabric and elastic on hand.  Yes I'm a hoarder....I like to call it being prepared.  You never know when on the night before the first day of school your 6 year old is going to complain that she has nothing to wear and you need to whip up a simple skirt.  I was prepared!
And look at these adorable Hide-eez.  I'm getting them for all the girls.  In multiple colors.  I also took a stab at making a pair out of legging that my 8 year old tore a hole in the knee, but that's another tutorial.
{Sewing Challenge #30}

Sewing Challenge #29

I just sewed Rapunzle's hair back on.  She is a stuffed doll that apparently gets a lot of use and this is mend #2 on her.

Chalkboard Sofa Table


Before...
After....
I'm still amazed what a little bit of paint can do.  But not just any paint....Annie Sloan's Chalk Paint (Old White.)  My new favorite kind of paint thanks to Miss Mustard Seed!
Still haven't decided what to write on it....

"Welcome"

"Your keys are here"

"Don't forget your lunch"

 Its for sale here. {SOLD}

Linking here:

Furniture Feature Fridays


Painting a tree on the nursery wall {tutorial}

(Note: photo taken with cell phone) 

 I've always wanted to do this and I usually wait to see how long we will stay before I decide if I'm going to put forth the effort just to move and let someone else enjoy my work.  So I jumped.  (You'd think I'd take it one project or one room at a time, but nope.  Not me.  I *LOVE* to start projects.  Finishing them is always hard, but I'm working on that part!

Supplies:
Picture
Projector (or not if you can draw :)
Pencil
Paint and brush
(These were all on hand, so basically free art!)

How to:
Find your picture.  After searching and searching for the picture I had created in my brain, these were the closest that I found.

I ended up going with the one on the right, because I wasn't sure how the wispiness (its a word...really) would show up.

Print out your picture.

After getting the projector setup and the picture centered, which was harder than it should of been because you have to think backwards and upside down when moving the picture around.  My picture wasn't small enough to completely fit under the projector square so I had to fiddle with placement and move it half way through tracing.

I put the pic up on the wall and closed the binds.  Stepping back I was worried that it was a little too scary looking, but I knew I was painting it white and hoped it would turn out pretty, not scary.  (Should have taken a picture but was too excited to start drawing.)

Then I started drawing.  The first few pencil marks were the hardest, then I had fun.  I had to laugh because three of my kids were watching Mommy draw on the wall, which is something they've gotten in trouble for in the past.  I went through 3 pencils sharpening trips to get it all on there we have really textured walls which ate the lead.
What???  You can't see it?  Yah...me either.  Which makes is a little difficult to actually paint in between the lines!  My camera had a really hard time focusing to take these pics.  Trust me...the tree is there. :)

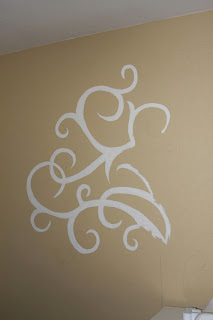
Then you just start painting.  Outlining first, then filling in.  Here it is after a couple of hours.  (It really shouldn't have taken me that long but I started with a small artist brush for the tips of the branches and forgot to grab my painting brush.
Here's another angle of the whole top part. (The room is really small...more of an afterthought for the builders I'm sure....and I don't have the right lens to get the whole tree.)
Here is the whole thing...
I still need to finish erasing the pencil marks and touch up a little.  I actually gave me some anxiety before I started, but heck...its only paint!

I want to add either a few 3D flowers or birds or something.

At least I got to check something off my summer to do list!

LinkWithin

Related Posts Plugin for WordPress, Blogger...